
Microsoft 365 is an essential productivity tool used by millions of individuals and businesses worldwide. With a wide range of features and applications, it can be easy to overlook some of the most powerful productivity hacks that can help you get the most out of your M365 experience. Enhance the benefits of Microsoft 365 with these 365 Productivity Hacks and take your productivity to the next level.
Sort Emails Easily with Focused Inbox
Microsoft 365’s Focused Inbox is a powerful tool that intelligently sorts your email, helping you focus on what matters most. This feature separates your inbox into two tabs, Focused and Other, making it easier for you to manage your email messages.
Benefits
The Focused Inbox feature is designed to help you prioritize your email by automatically filtering out unnecessary messages, such as promotional emails and spam. It analyzes your email usage patterns and prioritizes messages from important contacts, allowing you to focus on the emails that matter the most. Focused Inbox also works across all your email accounts, personal and professional, making it easy to manage your inbox in one place.
Another great benefit of Focused Inbox is that it learns from your email usage patterns, becoming better at identifying what’s important to you over time. You can also easily reclassify emails between Focused and Other by opening an email and selecting “Move to Focused/Other” from the overflow menu.
How to Set Up & Use Focused Inbox
If you’re using Outlook for Windows and you have a Microsoft 365, Exchange, or Outlook.com account, you can easily turn on Focused Inbox. Here’s how:
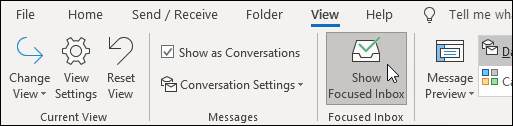
1. Open Outlook and select the View tab.
2. Click on “Show Focused Inbox.”
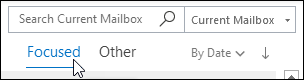
3. The Focused and Other tabs will appear at the top of your mailbox. You’ll be informed about email flowing to Other, and you can switch between tabs anytime to take a quick look.
To change how your messages get organized:
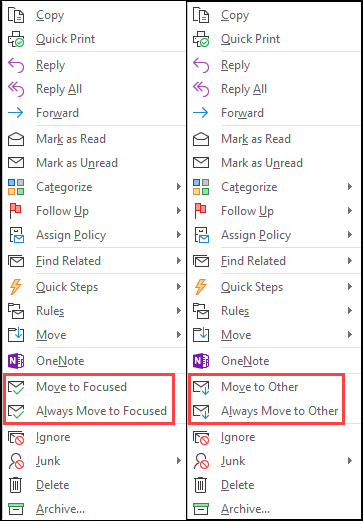
1. From your inbox, select the Focused or Other tab, and then right-click the message you want to move.
2. If you’re moving from Focused to Other, select “Move to Other” if you want only the selected message moved. Select “Always Move to Other” if you want all future messages from the sender to be delivered to the Other tab.
3. If you’re moving from Other to Focused, select “Move to Focused” if you want only the selected message moved. Select “Always Move to Focused” if you want all future messages from the sender to be delivered to the Focused tab.
Looking for productivity help? How can you find the best MSP to help?
Retrieve Emails with Message Recall and Replace
Have you ever sent an email and then realized that you forgot to include an important attachment or made a mistake in the message? With message recall and replace, you can retrieve a message that you sent and replace it with a corrected version. This feature is available in Microsoft 365 and Microsoft Exchange email accounts in the same organization.
Benefits
- Correction of errors: You can easily correct mistakes or omissions in your emails, such as forgetting to attach a file or including incorrect information.
- Avoiding confusion: If you sent an email to multiple recipients, you can avoid confusion by replacing the original message with a corrected one, rather than sending another email with the corrected information.
- Saving time: By recalling a message, you can save time by not having to send another email or contact each recipient individually to correct a mistake.
How to Setup & Use
To recall and replace a message, follow these steps:
1. Open the Sent Items folder in the folder pane on the left of the Outlook window.
2. Double-click the message that you want to recall.
3. From the Message tab, select Actions > Recall This Message if you have the Classic Ribbon.
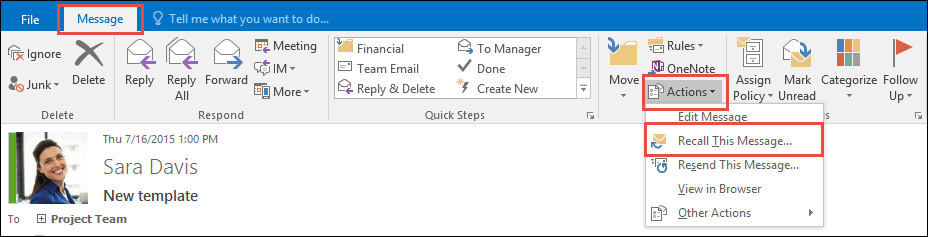
If you have the Simplified Ribbon, select the Message tab, select More commands (…), point to Actions, and select Recall This Message.

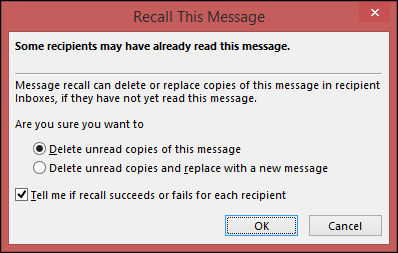
4. Select Delete unread copies of this message or Delete unread copies and replace with a new message, and then select OK.
5. If you’re sending a replacement message, compose the message and then select Send.
To check on the recall status, follow these steps:
1. After submitting a recall request, you will receive an email notification with the subject “Message Recall Report for message [original message subject].”
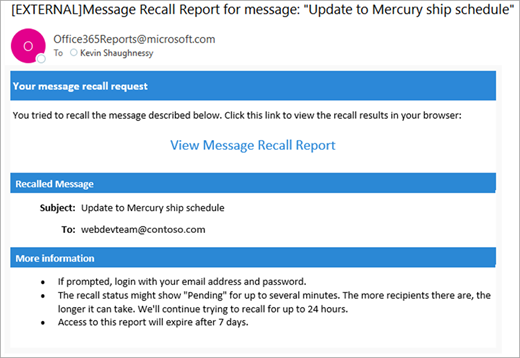
2. Select the View Message Recall Report link to view the report in your browser. If you’re prompted, log in with your mailbox credentials to view the report.
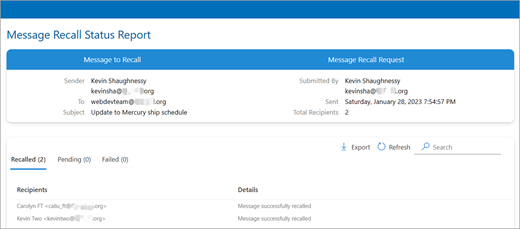
Recall actions are usually quick, but if the recall request can’t be executed right away, Microsoft will continue to retry for up to 24 hours before marking the recall as failed. Status updates are also quick but can take up to five minutes for a message with up to a few hundred recipients. For a large number of recipients, the recall itself is still fast, but it can take up to thirty minutes to retrieve the recall status for all recipients.

Document Recovery
Microsoft 365 offers a great feature called Document Recovery that can help you recover unsaved files and versions of files that you had open in case of a sudden system crash or unexpected application shutdown. This feature can save you time and frustration, especially if you were working on a critical document or a long project.
Benefits
- If a Microsoft 365 app closes unexpectedly before you save your most recent changes, Document Recovery automatically opens to help you retrieve your file.
- Document Recovery lists any files you had open that were recovered from the most recent time you saved them, the most recent time they were AutoSaved, or the most recent time they were Auto Recovered.
- You can review each file’s date and creation time to decide which version to save.
- Recovering documents in Microsoft 365 can save you time and frustration, as it ensures you don’t lose your work due to unexpected app closures or other issues.
How to Set Up & Use
1. Store your files on OneDrive or SharePoint and use AutoSave, which automatically saves your changes to the cloud as you work. This is the safest way to ensure you don’t lose your work.
2. If you encounter an unexpected app closure or other issue that prevents you from saving your changes, reopen the app. Document Recovery will automatically open to help you retrieve your file.
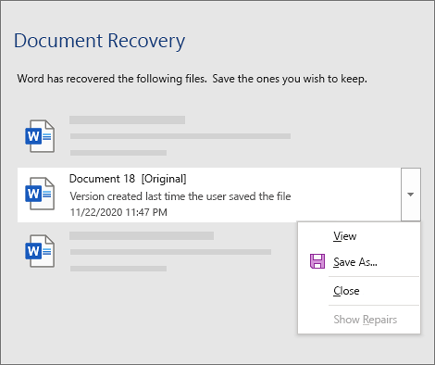
3. To see the entire Document Recovery pane, hover over the right edge of the pane until you see an arrow pointing left and right. Then click the arrow and drag it to the right to widen the pane.
4. Look for the date and creation time of each file in the Document Recovery pane. If you see multiple versions of the same file, choose the one with the most recent time to ensure you have the most recent changes.
5. Click each file to open it and review its contents.
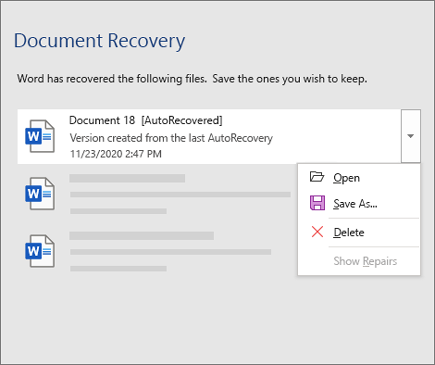
6. Click the down arrow to the right of any file in the Document Recovery pane and select one of the following options, depending on your needs:
- Open or View to review the file
- Save As to save the file
- Delete to delete the file
- Close to close the file
- Show Repairs to see if any file errors were detected and repaired
7. After opening any file in the list, you can continue working in it or save it.
8. When you have recovered all the documents you need, click Close.
9. Select one of the following options:
- Yes, I want to view these files later (safest option) – Select this option if you are not sure whether you need the data in the recovered versions of the files.
- No, remove the files. I have saved the files I need – Select this option if you are sure you don’t need the data in the recovered versions of the files.
10. If you click Close without reviewing all recovered files, you’ll see an option to view them again later. The next time you open the application, you’ll have the option to save or remove those auto recover files.
Customizing Teams Notifications
Microsoft Teams is a collaboration platform that allows users to communicate and work together seamlessly. However, with so much activity happening in the app, it can be challenging to keep up with notifications. That’s why Microsoft Teams offers different ways to access, receive, and manage notifications. In this blog post, we’ll explore the benefits of customizing Teams notifications and how to set it up.
Benefits
Here are some of the benefits of customizing Teams notifications:
- Improved Productivity: By customizing your notifications, you can focus on the messages and activities that are important to you. This will help you stay productive and avoid distractions.
- Better Time Management: You can choose when and where to receive notifications. By doing so, you can manage your time more effectively and avoid being interrupted during important tasks.
- Personalization: Customizing your notifications allows you to personalize your Teams experience. You can set up notifications based on your preferences and work style.
How to Set Up & Use
1. Open Microsoft Teams and click on your profile picture in the top-right corner.
2. Select Settings and more (…) > Settings.
3. Click on Notifications.
4. Change the settings to what you want.
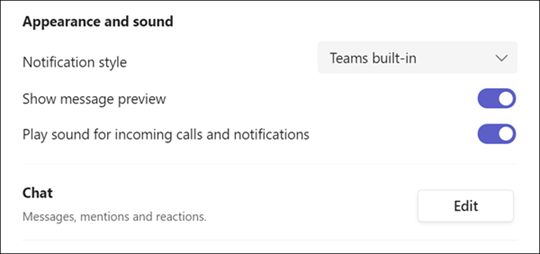
5. To modify your notification style, select Appearance and sound > Notification style:
- Teams built-in: Receive your Teams notifications in-app.
- Windows: View only your desktop notifications.
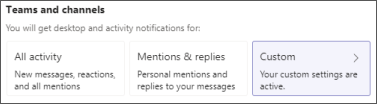
6. Under Teams and channels, choose which desktop and activity notifications you’d like:
- All activity: Adjust new messages, reactions, and all mentions.
- Mentions & replies: Adjust personal mentions and replies to your messages.
- Custom: Choose what you get notified for and how.
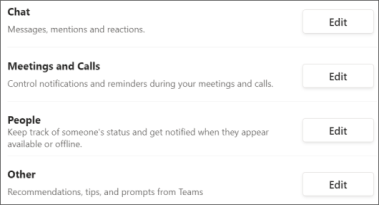
7. Under Custom, you can customize notifications for:
- All teams and channels: Change notifications for all teams and channels that you have access to.
- Shown and pinned channels: Change notifications for only a team or channel that shows up in your teams list or anything you’ve pinned.
8. Under Settings > Chat > Edit, you can customize your personal @mentions, notifications, and other messaging features in Teams.
Learn More about Better Productivity Partnering with an MSP
Sharing your Calendar
Sharing your calendar with others in Microsoft 365 can be a useful tool for keeping your team on the same page and ensuring everyone is aware of important deadlines, meetings, and events.
Benefits
- Improved Collaboration: By sharing your calendar with your team, you can collaborate more effectively, schedule meetings and appointments without conflicts, and avoid miscommunications.
- Increased Visibility: Calendar sharing makes it easier to keep everyone informed about upcoming events and deadlines. This can reduce the chances of missed appointments or misunderstandings.
- Better Time Management: By having access to your team’s calendars, you can better manage your time and prioritize tasks, ensuring that everyone is working efficiently and effectively.
How to Set Up & Use
1. Open your calendar in Outlook.
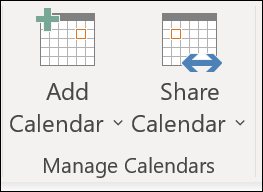
2. On the Home tab, click Share Calendar.
3. In the Sharing Invitation window, choose the calendar you want to share from the drop-down menu.
4. Enter the email addresses of the people you want to share your calendar with.
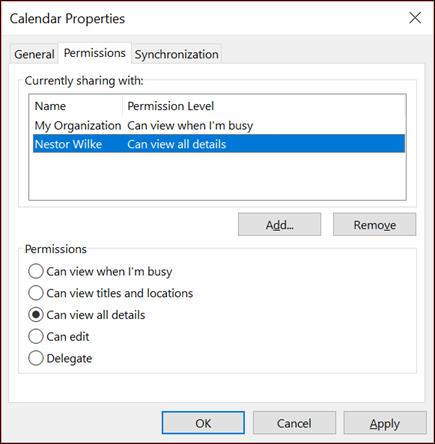
5. Choose the level of access you want to grant, such as “Can view when I’m busy” or “Can edit.”
6. Add a message to the invitation email if desired, and click Send.
7. The recipient will receive an email with a link to your shared calendar. They can click the link to open your calendar and view the events.
Note that there may be some restrictions on sharing your calendar, depending on your organization’s policies. For example, you may not be able to share your calendar with external users or people outside your organization. If you receive an error message when trying to share your calendar, it’s a good idea to check with your IT department or system administrator.

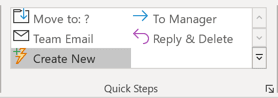
Automating Tasks with Quick Steps
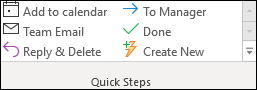
Automating recurring tasks can be a real time-saver, especially when it comes to managing your email inbox. One of the best tools available for automating tasks in Microsoft 365 is Quick Steps. With Quick Steps, you can apply multiple actions at the same time to email messages, making it easy to manage your mailbox quickly and efficiently.
Benefits
- Saves time: Quick Steps can help you save time by automating repetitive tasks such as moving messages to a specific folder, forwarding messages to your manager or peers, and marking messages as read.
- Increases productivity: By automating tasks, you can focus on more important tasks and improve your productivity.
- Customizable: The default Quick Steps can be customized, and you can also create your own to make a Quick Steps gallery of mail actions that you take most often.
- Easy to set up: Setting up Quick Steps is easy and can be done in just a few clicks.
How to Set Up & Use
Default Quick Steps & Editing
1. Open Outlook and go to the Mail section.
2. In the Quick Steps group, select the More Dialog Box Launcher button on the ribbon arrow at the side of the Quick Steps box to open Manage Quick Steps.
3. In the Quick Step box, select the Quick Step that you want to change, and then select Edit.
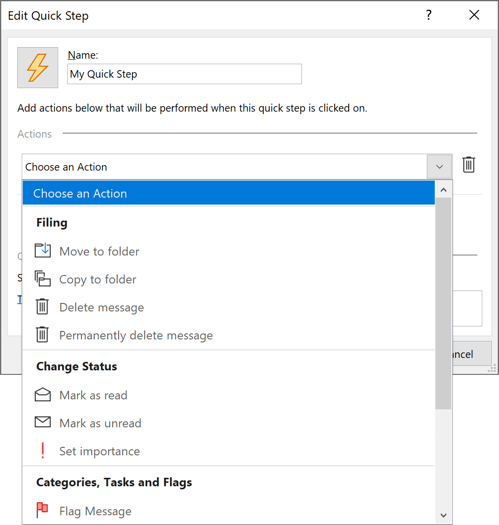
4. Under Actions, change or add the actions that you want this Quick Step to do.
5. If you want, in the Shortcut key box, select a keyboard shortcut that you want to assign to that Quick Step.
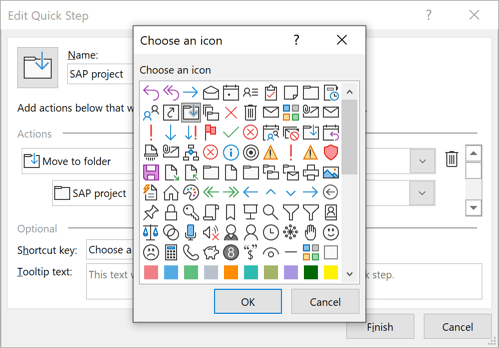
6. If you want to change the icon for a Quick Step, select the icon next to the Name box, select an icon, and then select OK.
To create a new Quick Step
1. In the Quick Steps group, in the Quick Steps gallery, select the Create New Quick Step.
2. In the Name box, type a name for the new Quick Step.
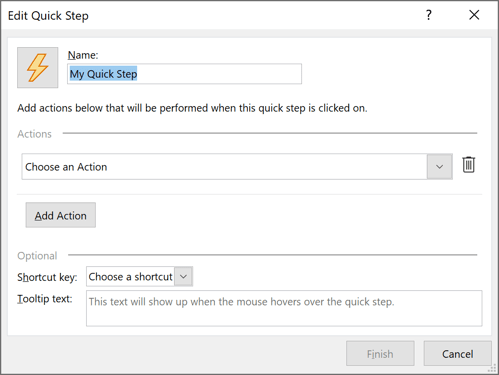
3. Select the icon button next to the Name box, select an icon, and then select OK.
4. Under Actions, choose an action that you want the Quick Step to do. Select Add Action for any additional actions.
5. To create a keyboard shortcut, in the Shortcut key box, select the keyboard shortcut that you want to assign.
Note: Quick Steps cannot be undone using a menu command or with a keyboard shortcut like Ctrl+Z. This is because Quick Steps can contain actions such as Permanently Delete that are not able to be undone.
Remotely Access Files with OneDrive Fetch
Remote access to files is a critical need for individuals and businesses. Whether you are at home, in the office, or on the go, you may need to access a file that’s located on another device. Microsoft’s OneDrive offers a powerful solution to this problem with its fetch remote access feature. In this blog post, we’ll explore the benefits of using OneDrive Fetch and how to set it up.
Benefits
- Access files from anywhere: With fetch, you can access your files from virtually anywhere and from any device, including desktops, laptops, tablets, and smartphones.
- No need for VPN or Remote Desktop: Fetch allows you to remotely access files without having to set up a VPN or Remote Desktop.
- Download and view files: You can download and view files from virtually any device, including videos and images.
- No additional software: There is no additional software to install or router configurations to make. Simply enable the feature and start accessing your files remotely.
Learn more about how an MSP can help with your remote workers.
Set Up & Use
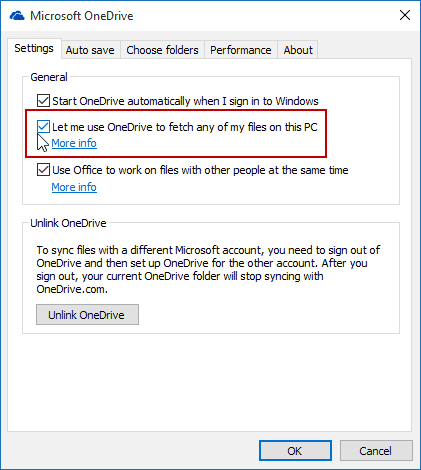
To enable fetch access in OneDrive, follow these simple steps:
1. Right-click on the OneDrive icon in the system tray and select “Settings.”
2. Check the box that says “Let me use OneDrive to fetch any of my files on this PC.”
3. Open OneDrive on the web and sign in to your Microsoft account.
4. From the left pane, select the computer that contains the files you need.

5. You can access files on your local C: drive, any mapped network drive, or connected internal or external drives.
Important Considerations for Using OneDrive Fetch:
- The fetch feature works best on Windows 10 machines.
- The computer you’re trying to remotely access needs to be powered on and connected to the internet.
- You cannot fetch files from a PC running Windows 8.1 or a Mac, but you can use these devices to access files.
- You may be asked for a verification code to use the Fetch feature.
Manage Email Better with Outlook Rules
Email can quickly become overwhelming, with messages pouring into your inbox every minute. Luckily, Microsoft 365 offers a powerful solution to help you stay on top of your email: Rules.
With Rules, you can automate many common tasks, like moving messages from a certain sender to a specific folder, or flagging messages with a particular subject line.
Whether you’re looking to declutter your inbox or streamline your email workflow, Rules can help you become more productive and efficient.
Benefits
- Automate repetitive tasks: With Rules, you can automate many common email tasks, like moving messages to specific folders or flagging messages with certain words in the subject line. This can save you time and mental energy.
- Stay organized: Rules can help you stay organized by automatically sorting your messages into folders. You can even set up Rules to color-code messages or play sounds when certain criteria are met.
- Increase productivity: By automating repetitive tasks and staying organized, you can increase your productivity and focus on the most important emails in your inbox.
Set Up & Use
1. Right-click a message in your inbox or another email folder and select “Rules.”
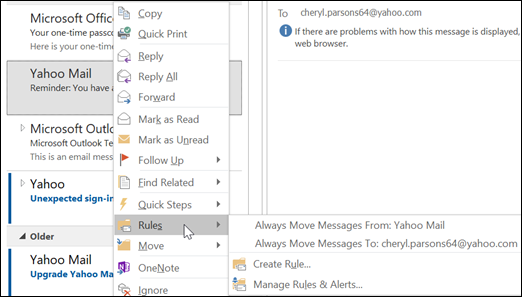
2. Select one of the options. Outlook will suggest creating a rule based on the sender and the recipients. To view more options, select “Create Rule.”
3. In the “Create Rule” dialog box, select one or more of the first three checkboxes.
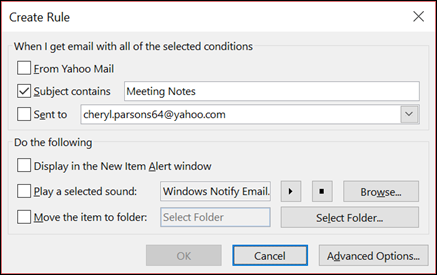
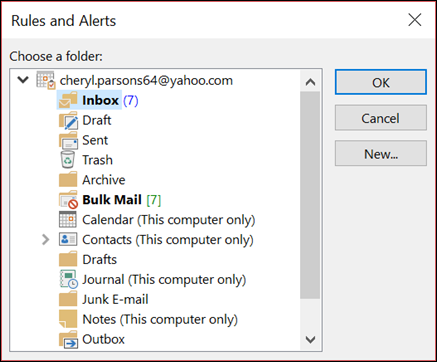
4. In the “Do the following” section, if you want the rule to move a message to a folder, check the “Move item to folder” box, then select the folder from the “Select Folder” dialog that pops up, and then click “OK.”
5. Click “OK” to save your rule.
Alternatively, you can use the Rules Wizard to create more complex rules. There are three types of rules you can create: Stay Organized, Stay Up to Date, and Custom Rules. The Rules Wizard allows for more customization and options, but can also be more time-consuming to set up.
In today’s fast-paced world, productivity is key to success. With Microsoft 365, there are several hacks that can help you work more efficiently and effectively. By using these hacks, you can maximize your productivity, improve your business processes, and achieve success in your professional life. So, start implementing these hacks today and watch your productivity soar!
Follow Us!
Recent Comments